How to create a player whitelist in Roblox
If you want to control who can enter your Roblox experience, you better set a whitelist to allow certain players in. Developers often use whitelists for beta tests, private builds, staff areas, closed events, or early access sessions. In this piece, we go over everything you need to know about Roblox whitelists, what they are, how to create them, and more!
What is a player whitelist?
A player whitelist is a list of approved Roblox users. If a player appears on the list, they can stay in the game. If they do not appear on the list, the game removes them.
A whitelist works in the opposite way to a blacklist. A blacklist blocks selected users. A whitelist blocks everyone except selected users. This makes it useful when you want a closed test or a controlled player group.
In Roblox, a whitelist can check a player by their “User ID.” This is the safest simple method because each Roblox account has a fixed UserId. A player can change their username, but the UserId stays the same.
Common uses for a Roblox player whitelist include:
- Testing an unreleased game with a small group
- Giving access to moderators or staff
- Running a private community event
- Protecting admin-only areas
- Letting selected players test new systems before release
A whitelist should run on the server. A LocalScript can hide buttons or menus, but it should not control the actual access.
- Also read: How to make a Roblox game
How to create a player whitelist
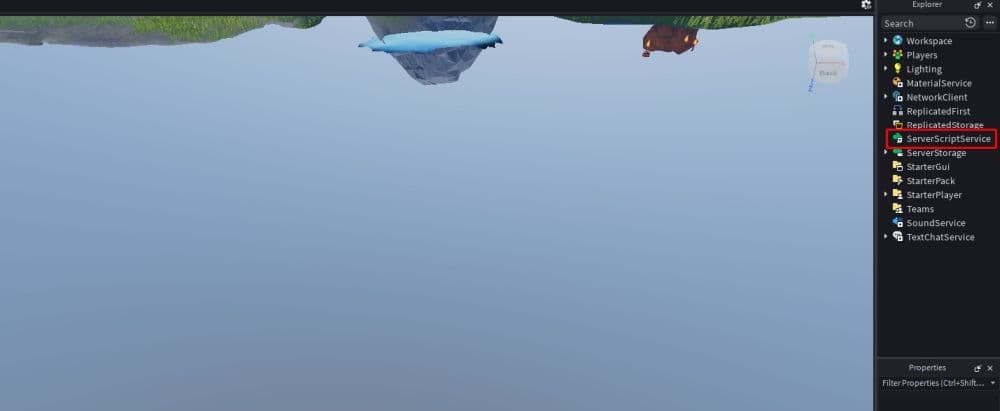
The easiest way to create a player whitelist in Roblox is to add a server script that checks each player’s UserId when they join. You can place this script inside ServerScriptService in Roblox Studio.
First, collect the UserIds of the players you want to allow. You can usually find a player’s UserId from their Roblox profile URL. Copy only the number, then add it to your whitelist table.
Follow these steps:
- Open your experience in Roblox Studio.
- Go to ServerScriptService.
- Insert a new Script.
- Add the approved player UserIds to a table.
- Check each player when they join.
- Kick anyone who is not on the list.
- Test the game with both approved and unapproved accounts.
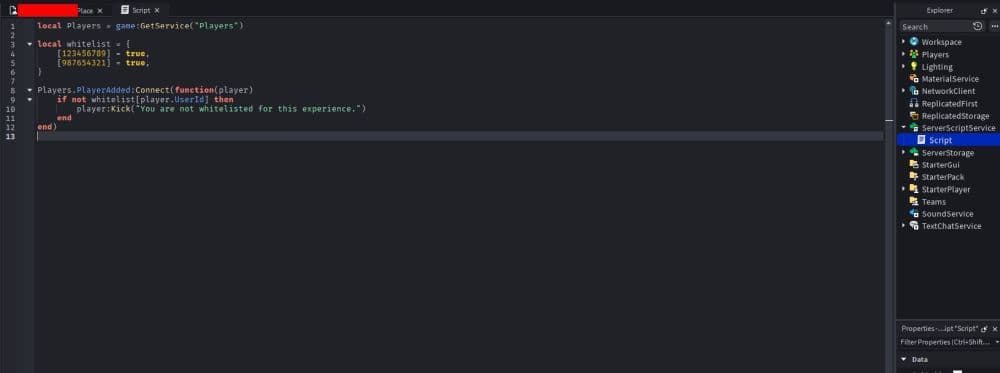
Use this basic whitelist script:
local Players = game:GetService("Players")
local whitelist = {
[123456789] = true,
[987654321] = true,
}
Players.PlayerAdded:Connect(function(player)
if not whitelist[player.UserId] then
player:Kick("You are not whitelisted for this experience.")
end
end)
Replace the example numbers with real Roblox UserIds. Keep the square brackets around each number and set each value to true.
The script does three simple things. It gets the Players service, stores approved UserIds in a table, then checks every player who joins. If the player’s UserId is not in the table, the game removes them with a short message.
Before you publish, test the whitelist in Studio and in a live server. Add your own UserId first, or you may lock yourself out of the experience.
- Related: Roblox creator tools and features updated: What developers need to know
Roblox whitelist script vs private server access
A Roblox whitelist script and private server access solve different problems. A private server limits who can enter that server instance. A whitelist script controls access inside the experience itself.
Private servers work well for small friend groups. A whitelist script works better for tests, staff builds, creator-only access, or games that need the same rule across every server.
You can also use both. For example, you can run a private test server and keep a server-side whitelist as a backup check.
When to use a DataStore whitelist
A small whitelist can stay inside one script. This works fine when only a few players need access and the list rarely changes.
A DataStore whitelist makes more sense when the approved player list changes often. With a DataStore, you can save access data across servers and sessions. This setup can support admin tools, live access changes, and larger testing groups.
Use a simple script table for early testing. Move to DataStores when your project needs live management.
Common Roblox whitelist mistakes you should avoid
Most whitelist problems come from weak checks or small setup errors. Avoid these mistakes before you publish:
- Do not use display names for access control.
- Do not place the main whitelist check in a LocalScript.
- Do not forget to add your own UserId.
- Do not publish before testing with an unapproved account.
- Do not keep a large changing list inside one script forever.
- Do not use a whitelist when private server settings already solve the problem.
If you enjoyed this guide, make sure you check out more of our Roblox guides:
- How to link your Medal account to Roblox: Step-by-step explained
- How to check Roblox play time: How many hours have I played
- What is the Roblox memory dump error and how to fix it
- Latest Roblox One Touch codes (February 2026)
- How to get multiple hairs on Roblox and layer hairstyles properly
Featured Image Credit: Roblox
All Related Guides
 How to start a hunt in Demonology (Roblox)Learn how to start a hunt in Demonology using cursed objects, Energy management, and hunt triggers to identify...
 Roblox playtime check: How to see how many hours you have on RobloxLearn how to check Roblox playtime, view weekly hours, track game activity, and estimate total time spent on R...
 How to make gamepasses in RobloxA simple guide to Roblox gamepasses, covering what they do, how to make one, and how to sell it the right way....
 Universal Tower Defense X tier list (2026): Best units & moreUniversal Tower Defense X tier list for 2026: best units, Infinite Mode picks, beginner recommendations, and c...
 How to get Dark Ring in Roblox Sailor Piece fastLearn how to get Dark Rings fast in Sailor Piece, including Jinwoo boss location, drop rate, respawn timer, an...
 Opera GX Forsaken rewards guide (2026)Opera GX Forsaken rewards guide: unlock exclusive skins, XP Boosters, Killer Chance Tokens, and daily event re...
 All Roblox color codes list & how to use themComplete Roblox color codes guide: BrickColors, RGB values, Color3, HEX conversion, and how to use colors in R...
 Guide to the Roblox Bite By Night x Medal Quest: Get your free Fighter Class skinRoblox Bite By Night x Medal Quest guide: how to unlock the free Fighter Class Skin fast and redeem the reward...
- 1
- 2
- 3
- 4
- 5
- 6
- 7
- 8
- 9
- 10
- 11